For the first time, turn-down collars became fashionable in the first half of the 17th century at the Swedish royal court. Before that, standing collars were worn everywhere in Europe.
Noble flaunted in collars decorated with embroidery and lace. And commoners covered their necks with ordinary white collars.
The fashion for the shape of the turn-down collar has repeatedly changed: it became shorter in the back and lengthened in front, the ends of the collar prevailed round, square or triangular in different periods.
A round white turn-down collar came into fashion at the beginning of the 20th century, thanks to the Broadway production of the musical Peter Pan. His form helped the actress create a naive young image of the protagonist. Thanks to this, the name "Peter Pan" was attached to this form of collar. And they were especially relevant in the 60−70s of the XX century.
In the first part of the master class, the processing of dress sides with a contrast transition edging was considered. Now we turn to the processing of the collar and stitching it in the neck of the dress.
Processing of the collar, sides and cuffs of the dress with a contrast transition edging
- Special offer
- 1
- 2
- 3
- 4
The round shape of the collar of this model is the best suited for finishing with a contrasting edging. In rounding, it is easier to make a uniform fit of the larger part and achieve an even transition edge.
Step 1

Cut out the details of the collar: the upper - from the main fabric, the lower - from the finishing fabric. The width of the allowances for the take-off and the seam of the collar-in is 1.0-1.2 cm. Duplicate both parts of the collar with a thin adhesive pad.
Step 2

Cut off with an allowance of the upper collar at a departure of 0.3 cm.

Superimposed on both sides of the collar. The upper collar is smaller than the lower.
Step 3

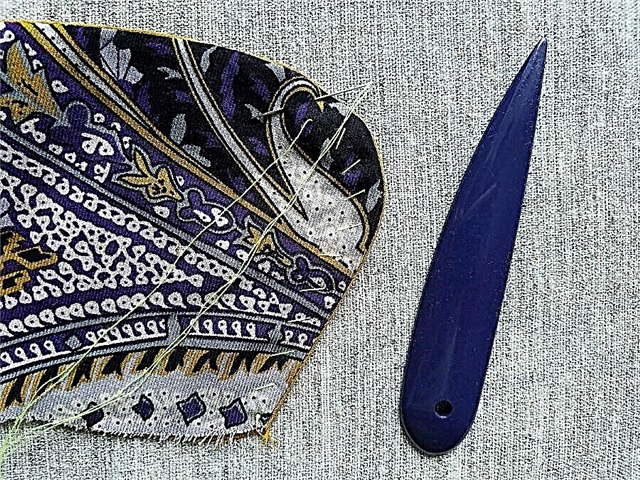
Fold both collar parts with the sides facing inward. Align the center of the collar on both parts. Chip off with pins, forming a small slack on the details of the lower collar.

Sweep the collars with manual oblique stitches from the upper collar side, fitting the lower collar on departure. In the future, this slack on the details of the lower collar will be required for the formation of the edging.
Step 4

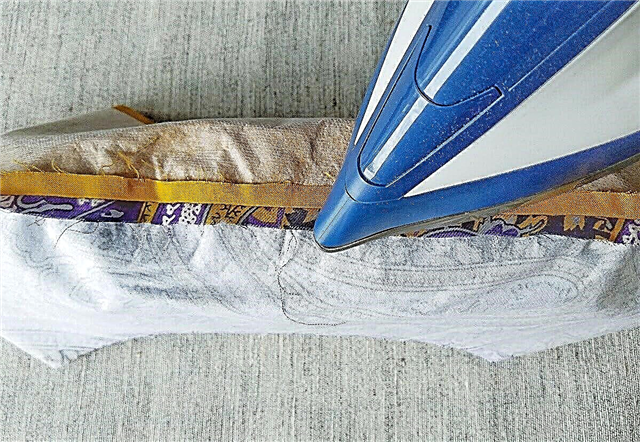
Stitch the fit to a width of 1.0 cm from the outer cut of the collar. In this case, the iron must be operated with light pressure, rearranging it from place to place, so as not to stretch the cut.

Collar prepared for turning.

Grind the collar at the exit with a stitch width of 0.7 cm. Lay the seam from the upper collar (note: the stitch is always laid from the side of the smaller part).
Step 5
Remove basting stitch. Ironing seam allowances using a leg or an ironing block for the collar.
11 accessories for perfect ironing

An unbuttoned seam for turning around the collar.

Carve allowances on the details of the lower collar to 0.2-0.3 cm. On the details of the upper collar, leave allowances of 0.6-0.7 cm. In the places of rounding, allowances should be cut to the nearest 0.1 cm.
Step 6
Turn the collar to the front side, straighten with a peg. Sweep the hem from the lower collar with manual oblique stitches.
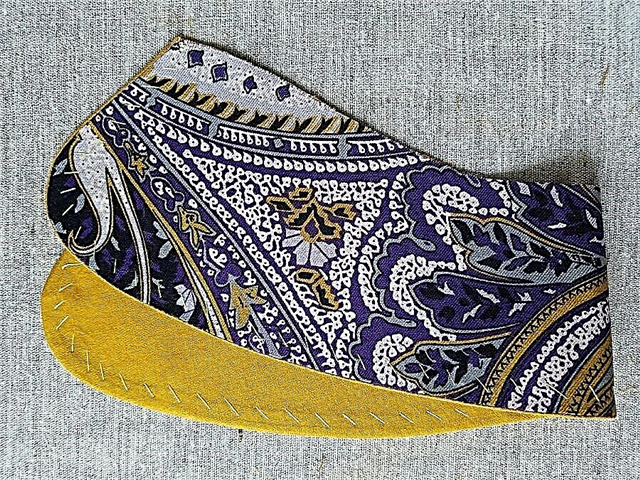
The width of the finishing edging is 0.2 cm. Iron.
View of the collar from the side of the lower contrast collar. Bend the collar in half along the midline and equalize the take-off edges. Check the symmetry of the collar shape. Fit the collar in the lower cut.

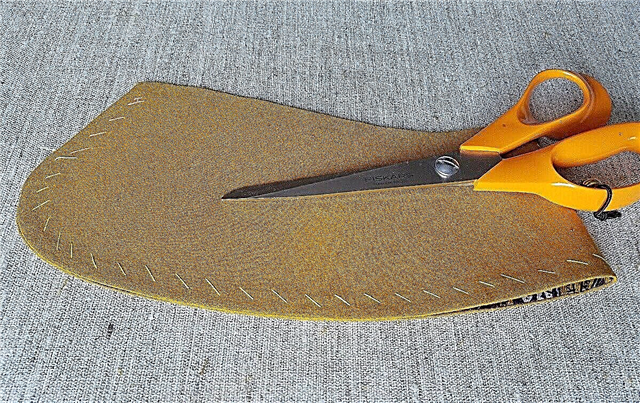
Lay the finishing stitch along the collar 0.1 cm from the grind seam or precisely into the grind seam. Stitch the line from the upper collar. To choose threads in tone to upper and lower collars or to use completely threads of contrast color.

Crafted collar, ready to be sewn in.
Step 7

Fold the dress in half, bending along the middle lines of the back and shelves. Align the corners of the sides and neck sections. Fit the neck and stock allowance.

Lay the fixing stitch on the seam allowance of the stitching of the collar.

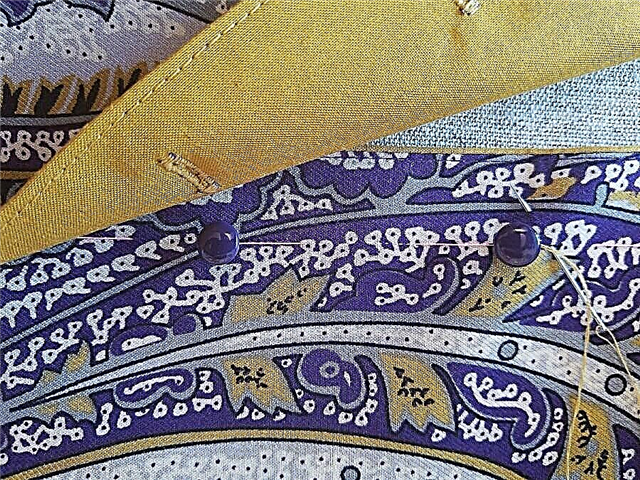
Place the collar with the bottom side on the front of the neck. Combine the edges of the collar with the lines of the half-drift on the shelves, as well as the center of the collar and the middle line of the back on the yoke. Align collar and neck sections and chip.

Unscrew the collar. Push both collar parts into the neck with one line, grabbing the details of the picks.
Important! Check the symmetry of the collar bushing. Control points: the width of the side, the location of the seams of the coquette stitching to the shelves, the marks of the upper point of the shoulder on the yokes, the upper edge of the collar, the middle of the back. On the right and left sides of the collar, these points must clearly coincide.

Stitch the collar into the neck with a seam width of 0.7-1.0 cm. In the corners of the collar, the stitching seam is a continuation of the seam of turning the sides. Stitch the line on the collar side. Iron the seam for sewing on the rib.
Step 8
Prepare a welt for edging the seam allowance for the sewing in of the collar. This is a strip of fabric cut at an angle of 45 degrees to the warp, 3.0 cm wide. It can be cut from the main or finishing fabric, if desired. Pull off the facing with an iron to stabilize it. Then, if necessary, equip the width of the grinder.

Apply facing to the upper collar, adjusting the sections. Draw it on the seam section of the stitching of the collar between the picks. Stitch the grind, trying to get exactly into the seam of the stitching of the collar.

To iron the seam allowances of the stitching of the collar and the stitching on the parts of the shelves and yokes. Carve out allowances for the seam of the stitching of the collar up to 0.6-0.7 cm, cut in the places of rounding.
Sewing machine. Lesson 9: do-it-yourself slanting inlay
Step 9

Bend over the seam allowance of the collar stitching by turning, sweep.

Hem the bending stitch manually with hidden stitches. Hem the shoulder slice to the inner yoke with hidden stitches.
Step 10

Lay the finishing stitch along the sides of the dress from the finishing stitch of the collar to the bottom of the fastener similar to the finishing stitch along the collar. Lay the line from the side of the shelves.

Sweep loops on the right side of the dress according to the model. Lay the locking stitch on the bottom of the fastener.
Sew on buttons.
Buttons covered with finishing fabric can become an additional decoration.
DIY Buttons
Continuation in the third part of the master class:
Processing cuffs of sleeves of a dress with a contrast transitional edging
The author of the master class and photo: Elena Lenkova

Lena has a higher and special education - a tailor of outerwear for men, women and children.
In clothes, he appreciates the individuality and thoughtfulness of the image, the originality of the cut. He likes to analyze modeling techniques and product processing technology. Leads his page on Instagram. Many people know Lena as a longtime user of the BurdaStyle.ru website.
"The quality of processing and the interior decoration of the product are integral aspects of sewing."
Material prepared by Julia Dekanova