Share
Pin
Tweet
Send
Share
Send
How to correctly select the right fabric? Birgit Rotfus and Heidemari Tengler-Stadelmeier - fabric professionals as well as Burda experts are ready to share their valuable experience with us.
Tips for Beginners
If this is your first time sewing a sewing machine, do not sew from “sliding” fabrics such as satin, georgette or chiffon. For beginners, dense fabrics, such as linen or cotton, are more suitable. On products stitched from them, small errors will be almost invisible.Feel free to ask in specialized stores about the properties of the fabrics you want to purchase.
Label Symbols: Fabric Care
When choosing a fabric, be sure to look at the care instructions on the label. You can’t usually see it on store rolls of fabrics, so be sure to ask the sellers to show you the manufacturer’s label.Below are the most important, universal symbols for all countries, which you need to pay attention to.
Wash (basin with water)
The number in the water basin means the maximum heating of the water during washing - this temperature must not be exceeded. A dash under the basin means that the fabric needs to be washed in a delicate mode.

Hand in a basin - machine wash is prohibited. Only gentle hand wash is allowed.
If a basin of water is crossed out, then washing is in principle impossible.
Whitening (triangle)

Triangle means whitening. If the triangle is crossed out, then bleaching is not allowed.
Ironing

If you see three dots on the symbol of the iron, then the fabric (for example, linen) can be ironed with the most heated iron. Two dots indicate that the iron should be heated moderately (for example, for ironing woolen fabrics).

One point - the iron is heated minimally (a symbol for ironing silk or fabrics with chemical fibers). If the iron symbol is crossed out, then the fabric cannot be ironed at all.
The points correspond to the temperature gauge on the iron.
Chemical cleaning (circle = drum)
The letter in the circle indicates which method and means should be used for dry cleaning.
If the circle is underlined, then cleaning should be carried out in a gentle way, that is, mechanical exposure and humidification should be minimal.
 Letter A: dry cleaning with any solvent.
Letter P: Normal cleaning procedure with restrictions on certain solvents.
The underlined letters P and F, as well as the letter F without underlining, mean gentle dry cleaning with restrictions on solvents (self-cleaning is prohibited).
Drying (drum)

If the drum is not underlined, then drying is allowed in the washing machine. Dots inside the symbol indicate the drying temperature. If the symbol is underlined, the fabric is not suitable for machine drying.
Decathing
Fabrics, and primarily stretchable, for example with elastane fibers, must be washed or ironed under steam before cutting. This way you can avoid warping on an already stitched product.The main rule: all fabrics, the products of which you are going to be washed at home in the future, just in case you need to wash before cutting!
Fabric Tips

To make your model sewn flawlessly, when buying fabric, pay attention to ensure that its properties correspond to the recommended materials as best as possible (these recommendations are always given in the magazine of the mod of Burda).
Also make sure that the width of your fabric is the same as in the sewing instructions, although this is not necessary, but cutting from it will be much more convenient and more profitable for you.
Tip: you can calculate the tissue consumption by yourself, folding the sheet to the required width, laying out paper patterns on it taking into account the direction of the thread and then measuring the length of the cut.
Pattern direction

Translation of the inscriptions in the figures: richtig - right, falsch - wrong.Patterns on many fabrics have a certain direction. This means that you need to lay out paper patterns on them in only one direction.
On patterned fabrics, it is necessary to immediately pay attention to whether their pattern is symmetrical (including on fabrics in a cage). In our example, this is clearly visible. Of course, on the finished product, all the stems of the flowers should be pointing down.
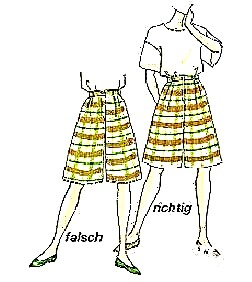
When cutting all fabrics with an asymmetric pattern, paper patterns are pricked so that the lower edges of the details of the patterns look in the same direction.
When cutting fabrics into a cage, fabrics in a transverse strip or with a transverse ornament, it is very important to combine their pattern along the longitudinal seams. To do this, paper patterns are pricked onto the fabric so that their lower edges lie on the same stripes of the pattern.
Pile direction
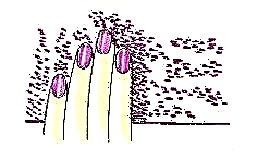
Velvet, velveteen, terry cloth, velor, drape or loden - all these fabrics with a pile surface have the so-called pile direction. If you stroke the surface of the fabric along its edge with your palm, then you will feel it. The villi lie on the surface without resistance ("in the direction of the pile") or, resisting ("against the pile"). The direction of the pile is always indicated by an arrow on our layout plans.
Important: when cutting fabrics with pile, be sure to lay paper patterns in one direction, that is, their lower edges should always look one way.
Layout plan
The layout plan shows the most optimal way to lay out paper patterns on the fabric from which the model is sewn.For most fabrics, the edges are stiffer than the fabric itself, so edges are never taken into account when calculating fabric consumption.
If the fabric for cutting folds in half, then the front side is always inside.
If cutting is made from fabric laid out in one layer, then on our layout plans the front side is always on top.

This is the simplest layout plan: the fabric is folded along, all paper patterns are laid on the fabric in one direction. In this case, the fabric can be cut in the same way, regardless of whether it has a directed pattern or a pile or not.

If the lower edges of the paper patterns are looking in different directions, as in this layout layout, caution should be exercised. In this case, according to our layout plan, it is impossible to cut fabrics with an asymmetric pattern or brushed.
If the fabric on the layout plan is folded in half not along, but across the cut, as in our example, it should also not have an asymmetric pattern or pile
Important: all the details of the paper pattern outlined on our layout plans with a solid line are laid on the fabric with the side up side down. Parts outlined in dotted lines on the layout plan are pushed onto the fabric with the label side down.

The fabric can also be folded so that a fold appears on both sides. In this case, it is important to ensure that the edges of the fabric lie at the same distance from the fold. How to fold the fabric is indicated on the layout plan.
Details of the paper pattern that protrude beyond the layout plan are cut out last of all from a fabric laid out in one layer.
To do this, lay the remaining fabric on the table with the wrong side up. Paste a paper pattern on the fabric, draw allowances around the seams around it.

Take it out. Place the remaining fabric on the table face up. Paste an already cut part face to face on a cloth and cut out the second part.
Large details that can be cut out folded in half (with a fold), but which on the layout plan are given by cutting out fabric in one layer, cut as follows: put the fabric on the table with the wrong side up. Paste a paper pattern on the fabric according to the direction of the thread. Then fold the fabric along the edge of the paper pattern marked Stoffbruch (fold the fabric), the front side is inside, and pin it (bottom right).
Around the paper pattern on the fabric, outline the seam allowances and hem hem. Cut out the part.
Parts that need to be cut twice, cut as described for cutting the sleeve.
Tip: small parts cut out with a bend, which are given in the same form on the layout plan as on our version of the collar part, will be easier to cut if you draw the same part again, and then glue both halves along the bend line.

When cutting asymmetric models, you should be careful. Each asymmetric part must be cut only from fabric laid out in one layer on the front side.
Important: on all Burda paper patterns, the sealed side means the front side. This means that the details of paper patterns of asymmetric patterns are always impaled on the front of the fabric.
Abbreviations on Tissues
Below you will find the most important abbreviations and their decoding for textile materials. Click on the picture to enlarge it.
Share
Pin
Tweet
Send
Share
Send