Share
Pin
Tweet
Send
Share
Send
For products in the style of patchwork it is not necessary to combine plain fabrics with fabrics of traditional colors. Bright fabrics with large exotic patterns will make the patchwork exclusive ...
WHAT YOU NEEDFor the upper side of the patchwork: various flaps of fabrics with a bright Asian pattern
For the underside: plain fabric in a suitable color 820 x 112 cm in size Suitable thread for a sewing machine
Non-woven size 240 x 250 cm
Contrast basting threads
Threads suitable for color and quality for embroidery in two colors
Red polyester thread for sewing
SIZE COVERS 240x250 cm
SKETCH AND CUTTING
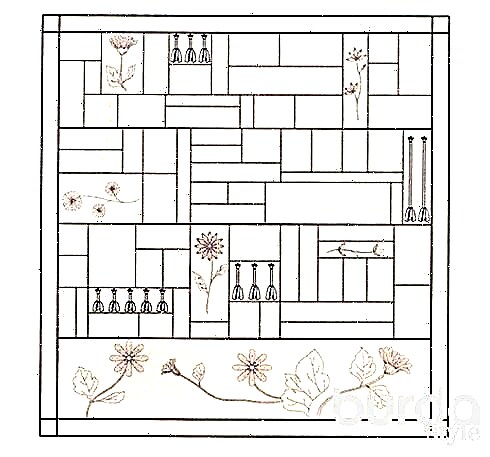
Glue the required number of sheets of paper into a single sheet measuring 240 x 250 cm. At a distance of 10 cm from each edge, draw straight lines to the very edges of the paper. Draw three horizontal lines inside the resulting rectangle, as a result you get four horizontal sections. (Of course, you can come up with your own design.) Inside each section, draw the desired location of the flaps. The lower section may consist of a single flap (for this it is better to take a fabric with a large, non-repeating pattern).
After the patchwork sample is ready on paper, lay the pieces of fabric on it so that they harmoniously fit together. Number the patches and transfer the numbers to a paper sample. Cut the flaps of the desired shape and size with allowances for seams 0.6 cm wide across all sections. From the fabric for the underside, cut 3 strips each 273 cm long.
OUR ADVICE Pin the numbered flaps of fabric to graph paper: this way you can cut them more accurately.

STITCHING, EMBROIDERY AND STITCH
First, sew together small pieces of patchwork, then connect them into large blocks. Do not forget to regularly iron the parts to be machined and the blocks to be machined and immediately iron the allowances for the darker fabric flaps. If you want (as on our sample) to additionally decorate the patchwork with embroidery, translate or apply hand-drawn motifs for embroidery on plain fabrics. You can copy the motifs drawn on paper by attaching a motif on paper and then a plain fabric to the window pane. Transfer motifs with a special felt-tip pen, the paint of which disappears with time, and embroider the motifs before it disappears.
Now grind all three layers of the product together (the upper part is made of shreds, the non-woven fabric and the lower side are of the same fabric, but first grind the details of the lower side and iron the seam allowances). The three-layer central part allowances are flat ironed. Trim the excess allowances so that the central part of the bedspread is 264 x 273 cm in size. On the upper side of the bedspread, cut the allowances to a width of 2.5 cm. Chip off these allowances, grabbing all three layers of the product, and sweep. Cut non-woven allowances to a width of 10 cm.
Now, on the front side of the product along the sewing seams, sew the stitch either on the machine or manually (see the description below). To highlight the Japanese style, pierce through all three layers at one point in the corner of each shredded patch or at certain intervals for embroidery, pull the threads so as to obtain a relief surface (the thickness at this point should not exceed 5 mm) and tie a knot. Cut the threads at any height.

COMPLETION OF WORK
Lay the cover with the patchwork side up and wrap up, on the side of the shreds, the allowances for the underside of the plain fabric. Tuck the edges of the lower part of the bedspread inward so that they cover the first seam of sewing all three layers of the product. Iron. Re-lay in one layer.Transfer the ornament to the upper edge of the edging and embroider it with suitable (or contrasting) threads in color. Wrap up the edges of the lower side of the bedspread again, pin and bast. Sew along the seam of the first sewing of all three layers of the product. Remove the basting threads.
From small scraps of fabric, perform various decorations (see the previous photo). For example, twist narrow rags into a tourniquet, and sew a simple bow on one end. Sew jewelry to the upper side of the product manually in random order.ONCE AGAIN PRO STRING
Quilted products made of shreds consist of three layers: the upper and lower (from shreds, or, as an option, the upper - from shreds, the lower - from plain fabric) and internal (voluminous, which gives the product a special relief when quilting). Before joining all three layers, carefully iron the top and bottom sides. Lay out the bottom side face down and fix it on the surface with masking tape. Lay out the inner part and the upper side (face up) on the lower one, smooth it out evenly and fix it with safety pins from the center to the periphery at 20 cm intervals.
If you are going to quilting the product manually, then sweep all three layers up and down at intervals of seams of 15 cm, removing pins one by one. Only after that, draw a quilting line on the upper side of the product with a thin pencil.

SEWING WITH A SEWING MACHINE
Make sure that the upper and lower sides do not slide relative to each other. To do this, insert the special, raised foot of the machine. Always sew from the center to the periphery, otherwise waves will appear on the product.
So that the seam on the product is almost invisible, but a beautiful structure appears, scribble exactly into the seam of sewing shreds.
At the end and beginning of the seam, make fasteners: raise the bobbin thread up and make a few stitches of the smallest size. Optimum tack length - 7 mm. After you bind, trim the ends of the threads.
Tip: while quilting, twist the free part of the product into a roll - so it will be more convenient for you to work.

MANUAL BELT
With this method of operation, the product is pulled into the frame (like an embroidery hoop). The ideal option is a handmade frame that can be leaned against the table, as a result you will have free hands.
When stitching manually, also sew from the center to the periphery. With a small needle with a thread 50 cm long, at some distance from the starting point, sew stitches through all three layers of the product. In one go, make several even, fine stitches, then gently pull the thread.
Tip: It will be easier to work if you put a thimble on the middle finger of the working hand, and put on a leather cap on the index finger of the other hand, which supports the product from below.
Share
Pin
Tweet
Send
Share
Send